29 March 2009

Step 5 - stitch variety


The books have arrived!!! I'm now trying a variety of stitches in the same color.

In this picture, the first column (top to bottom) are tie stitch, rice stitch, florentine stitch, long armed cross stitch (is there a one-armed bandit stitch?), second column: smyrna stitch, and Italian cross stitch. I can see that the different stitches produce different effects... to my (untrained) eye, the tie stitch looks like a careful, fixed, background, maybe if there's a rather orderly surface of something, this might look okay. The rice stitch seems to give a feeling of a rough texture, the florentine stitch (on a normal canvas?) would be good for a smooth surface or background, the long armed cross stitch has a slightly rougher appearance, but has a certain flow to it. The smyrna stitch looks like a plant (or fireworks) or at least gives a light feeling, and the Italian stitch seems to me to be somewhere in between the rice stitch and the smyrna - the rice stitch seems thick, the smyrna thin. (Not sure any of this is right. Just my initial impressions.)

I can see how the variety of these stitches add texture - knobbly or smooth, bristly or flat - to a representation of a wall. However, some "threads" don't lend themselves to being used as such. Note to self: stay away from the fluffy, mischievous kind of yarn.

27 March 2009

Steps 5 & 6 (2nd attempt)


Ok, here we go again with a different stitch, and this time, using a stronger material to stitch on, kind of like burlap, but stiffer.

This time, it was much easier to work with the yarns and threads, but that impudent fluffy yarn crept back into the room (top of the second column)... once again, impossible to get through the "canvas". It even broke some of the threads. Out you go!

As I was stitching and having an evening snack with the family, I took a shiny candy wrapper, cut it into long thin strips, and experimented with sewing that as well.

18 March 2009

Steps 5 & 6 (1st attempt)

I ordered "Mary Thomas's Embroidery Book" and "Needlework School". While I was waiting for the books to arrive, I went to http://www.stitchopedia.com/ and found a whole passel of stitches. My first reaction was... you mean there's more than one stitch? I tried making samples using the "tie stitch" in various kinds of beige thread on a dark green background of the Philippine Screen.


A: cotton kona fine (that's what the label says)
B: "Love Bonny" yarn
C: embroidery thread
D: an old rubber band (but it broke); a stalk of weed growing in the rice field behind my house
E: variegated jute
F: cotton kona in a different shade
G: some VERY unruly yarn. It looked and felt so soft when I bought it, but it was simply so uncontrollable that I sent it out of the room!
H: some kind of yarn that looks like a cross between porridge and a sheep (I'll have to remember this one if I ever create something commemorating Wallace & Gromit's "A Close Shave"). On the label it says "bu-kure" - it this the boucle cotton listed in Sian's sample in the instructions on p. 6?
I: silk wool lame with sparkly silver threads running through
J: satin ribbon
K: embroidery thread (different shade, still practicing the stitch)
L: variegated mohair yarn
M: sewing thread
N: (jute, practice)

The most difficult part was trying to control the stitches when the canvas threads kept moving around. Hmmm, there must be a better way...

12 March 2009

Steps 3 & 4

I made a colour study of the wall. I cheated (is that okay?) by enlarging the jpg to the umpteenth degree and was able to see in detail the wide range of hues that make up the normally-viewed gray, brown, beige, and white wall. Fascinating - there are blues and purples along with a kind of pinkish orange.


I created a shape observation page. using red tissue paper on a white sheet of drawing paper. (image is reversed here)

02 March 2009

Step 2 - a rubbing

From the small section I chose, I made a rubbing using black paper and a white oil pastel. Hmm, not sure which way to use the pastel, and since the corners on it were still perfect(ly sharp),at first it seemed as though there were more lines from the pastel than there were marks from the more pronounced features of the stone. Working with it a bit more, and filling in the paper, some patterns began to emerge. It felt strange to have big empty spaces, but of course, those were the spaces between the stones.


Would like to go back and do another rubbing using white paper and a black pastel...

01 March 2009

Step 1: Finding materials and a wall

Went downtown yesterday to go to the largest fabric store in Nagoya (Japan), Otsukaya. Found most of the thread-related items on the list of materials for the course, but they didn't have the variety of threads and yarns that there is in the UK or in the US. Hmm... may have to improvise more than I had thought. What really surprised me was that they did not have needlepoint canvas. They had something from Germany but the weave was so tiny that I'd have to buy a magnifying glass the size of Alaska to be able to see what I was doing. No way to get yarn through those minute spaces. What to do. On the "hobbies" floor, I found something they call "Philippine Screen" and got several colors of that to use for the time being.

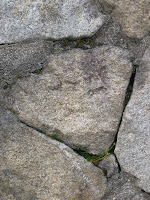
Came home, found a wall. A rather nice one, I think. Old, full of character and rain gutter wear. With moss and little green plants in between the rocks.


Chose one area to focus on...


And one small section...


Now on to Step 2.