08 April 2010
07 April 2010
Additional Information
Certificate Module One
Costing
Please see Expense Sheet at:
https://spreadsheets.google.com/ccc?key=0Ajc-zpEUOvzpdEhkb3VvRFJXbXNxdGtvLWNiMkxMdVE&hl=en
Timing
Total hours for...
Chapter 1: (approx) 13
Health and Safety Rules Observed
Make it a habit to:
• turn off the iron after each use
• put scissors and other sharp tools back in
protective pockets away from cat and self
• put away items being worked on so as to keep them
in good shape
• keep workspace relatively organized and uncluttered
(prevents accidents, tripping, etc.)
• keep ink/paint/marker lids & caps well sealed
when not in use
• wipe all brushes of excess paint before washing
(less waste material to wash down the drain and eventually into rivers)
• keep electrical / computer cords off the floor and
out of working areas
• work in a well-lit area
Costing
Please see Expense Sheet at:
https://spreadsheets.google.com/ccc?key=0Ajc-zpEUOvzpdEhkb3VvRFJXbXNxdGtvLWNiMkxMdVE&hl=en
Timing
Total hours for...
Chapter 1: (approx) 13
Chapter 2: (approx) 15
Chapter 3: 35
Chapter 4: 10
Chapter 5: 4
Chapter 6: 13
Chapter 7: 18
Chapter 8: 21
Chapter 9: 16
Chapter 10: 37
Chapter 11: 34.5
Chapter 12: 1.5
TOTAL HOURS: 218
- * - * - * - * - * - * - * - * -
Chapter 12 - Study of an Artist: M.C. Escher (1898-1972t
Study of an Artist:
M.C. Escher (1898-1972)
Maurits
Cornelis Escher was born in Leeuwarden, the Netherlands. He was not a keen
student and, with the exception of a weekly drawing class, found school a
nightmare. He later enrolled in the School for Architecture and Decorative Arts
in Haarlem to study architecture. A graphic arts teacher at the school, Samuel
Jesserun de Mesquita, recognized the youth’s talent and encouraged the young
Escher to switch his course of study to graphic arts.
- Disintegration: the process of losing cohesion; the process of coming to pieces.
- Transformation: a thorough or dramatic change in form or appearance.
- Metamorphosis: the process of transformation from an immature form to an adult form in two or more distinct stages.
I am intrigued by the method of
disintegration featured is this module. Contemplating the idea of
disintegration, I considered the work of Escher. It could be argued that
Escher’s Metamorphosis (below) is based on transformation rather than on disintegration.
However, it is the gradual breakdown of forms that allow new forms to develop.
The disintegration in Escher’s work is a controlled chaos instead of an organic
chaos.
Metamorphosis II (1940) Escher’s second version of the
theme of metamorphosis.
In 1926 Escher made his first trip to la
Alhambra de Granada in Spain. The rhythmic structure of the Islamic tiles
influenced much of his later work in lithographs and woodcuts.

Metamorphosis II - M.C. Escher (1940)
Another fascinating feature of Escher’s
work is the use of positive and negative shapes. For example, in Day and
Night, he uses
negative-aspect bird shapes flying in daylight toward the left (and white birds
become the daylight sky background), while geometrically equal mirrored
positive bird images in white fly through the night sky (of black bird shapes)
toward the right.

Day and Night - M.C.Escher (1938)
Sources
Ernst, Bruno. El Espejo Magico de M.C.
Escher. 1978. Taschen
Publishing, Germany.
National Gallery of Art.
http://www.nga.gov/collection/gallery/ggescher/ggescher-54213.html (Accessed 23 Feb, 2010).
Official Website of M.C.Escher. http://www.mcescher.com/ (Accessed 23 Feb, 2010).
- * - * - * - * - * - * - * - * -
Chapter 11 - Growth and Disintegration - Resolved Sample
In this chapter I had wanted to experiment with decay/disintegration as it applies to paper/fabric materials as well as to light.
First, I randomly sewed a piece of stiff paper, then took it outside and beat it between two rough rocks. The areas that were beaten longer had more holes/gashes. The holes from the sewing stitches also allowed more light through (image 11.1).
[Safety note: Keep your fingers out of the way when pounding! ;-) ]

Next, with another piece of stiff paper, I used a variety of needles and punched holes in the paper. Different spacing and frequency affected the amount of light that seeped through, as did the size of the holes. Finally, using a piercing tool, I was able to get quite large holes. If these are densely packed, the paper is torn apart (image 11.2).
[Safety note: Keep focused and pay extra attention to where the needles, etc. are going. I used a felt making tool and the brush base to make this paper sample.]

Turning the paper over (above picture), there is a variety of textures from something like a soft sandpaper to a rough surface.
Using a piece of blue origami, I folded and folded, scrunched, rumpled, straightened, and finally used my fingernail to scrape the color away. Using another rock-beaten light blue paper, I doused it with water, crumpled it several times which resulted in even greater disintegration. Used the tips of scissors to scrape stiff paper and also tried slashing it (orange sample below) (image 11.3).


First, I randomly sewed a piece of stiff paper, then took it outside and beat it between two rough rocks. The areas that were beaten longer had more holes/gashes. The holes from the sewing stitches also allowed more light through (image 11.1).
[Safety note: Keep your fingers out of the way when pounding! ;-) ]

11.1 stitched and pounded paper
[Safety note: Keep focused and pay extra attention to where the needles, etc. are going. I used a felt making tool and the brush base to make this paper sample.]

11.2 differently-sized holes punched in paper
Turning the paper over (above picture), there is a variety of textures from something like a soft sandpaper to a rough surface.
Using a piece of blue origami, I folded and folded, scrunched, rumpled, straightened, and finally used my fingernail to scrape the color away. Using another rock-beaten light blue paper, I doused it with water, crumpled it several times which resulted in even greater disintegration. Used the tips of scissors to scrape stiff paper and also tried slashing it (orange sample below) (image 11.3).

11.3 Three samples of
paper disintegration techniques
Used light blue and orange origami and an 8-pt star shape. Four squares starting with same 8-pt star, but each square breaks down a little more. Rather simple way to "disintegrate" by being torn to pieces (image 11.4).

11.4 Tearing apart paper
Wanted to do one more paper breakdown. Thought of things that disintegrate - stars! Well, not stars exactly, although they do over millennia, but a faster evolution is a comet. Chose a simple sun star shape, cut 7 copies of it and slowly cut them with a craft knife, glued the red pieces onto a light blue background, and showed the comet breaking up (image 11.5).

11.5 Comet disintegrating
Took a kind of washi in a turquoise, machine stitched (no thread) holes in the shapes of 5-pt stars. Each star gradually gets more and more holes and bigger ones. Set this paper against orange background. Against background light it looks like this (video clip 11.6):
11.6 video clip: stars with holes backlit
Moving along to trying using fabric to show modes of disintegration...
Using the ideas on p. 40 of the manual, folded and cut fabric and then frayed the inside/outside edges. Tried that with a couple of earlier star shapes, a snowflake, and some branches of a snowflake (image 11.7).

11.7 Cut shapes with frayed edges
Then made a simple 5-pt star shape appear to get smaller by increasing the numbers of rows of stitching and decreasing the hole size of the star. Also tried to make the shape disappear by adding more decorative boding pieces in red on blue against a red background (image 11.8).

11.8 Diminishing star (left); fading star (right)
Then attempted different sizes of one star shape using decoratively bonded felt pieces in ever decreasing sizes (1/quadrant, 4/quadrant, 16/quadrant, 64/quadrant). Interesting contrast. I see now that there are many, many ways to do this. I like the colors I chose, especially against the dark blue background. The shape was difficult to work with though, the 64 shapes quadrant in particular (image 11.9).

11.9 Star disintegration based on size
Finally, made a couple of sample paper layouts for the resolved sample. the first, a simple 8-pt star disintegrating outwards (image 11.10).

11.10 First paper sample for Resolved Sample
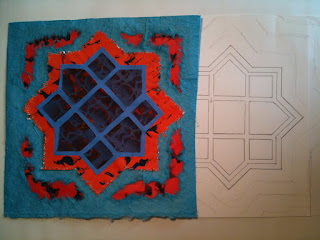
For several weeks I have been mentally tossing around the idea of doing something with a mosaic pattern I created on a web site [http://www.cgl.uwaterloo.ca/%7Ecsk/washington//taprats/] . I had thought of including light as a feature as well in the mosaic pattern, having light play from left to right as a representation of growth/disintegration (image 11.11).
11.11 Beginning of a paper sample
based on mosaic pattern
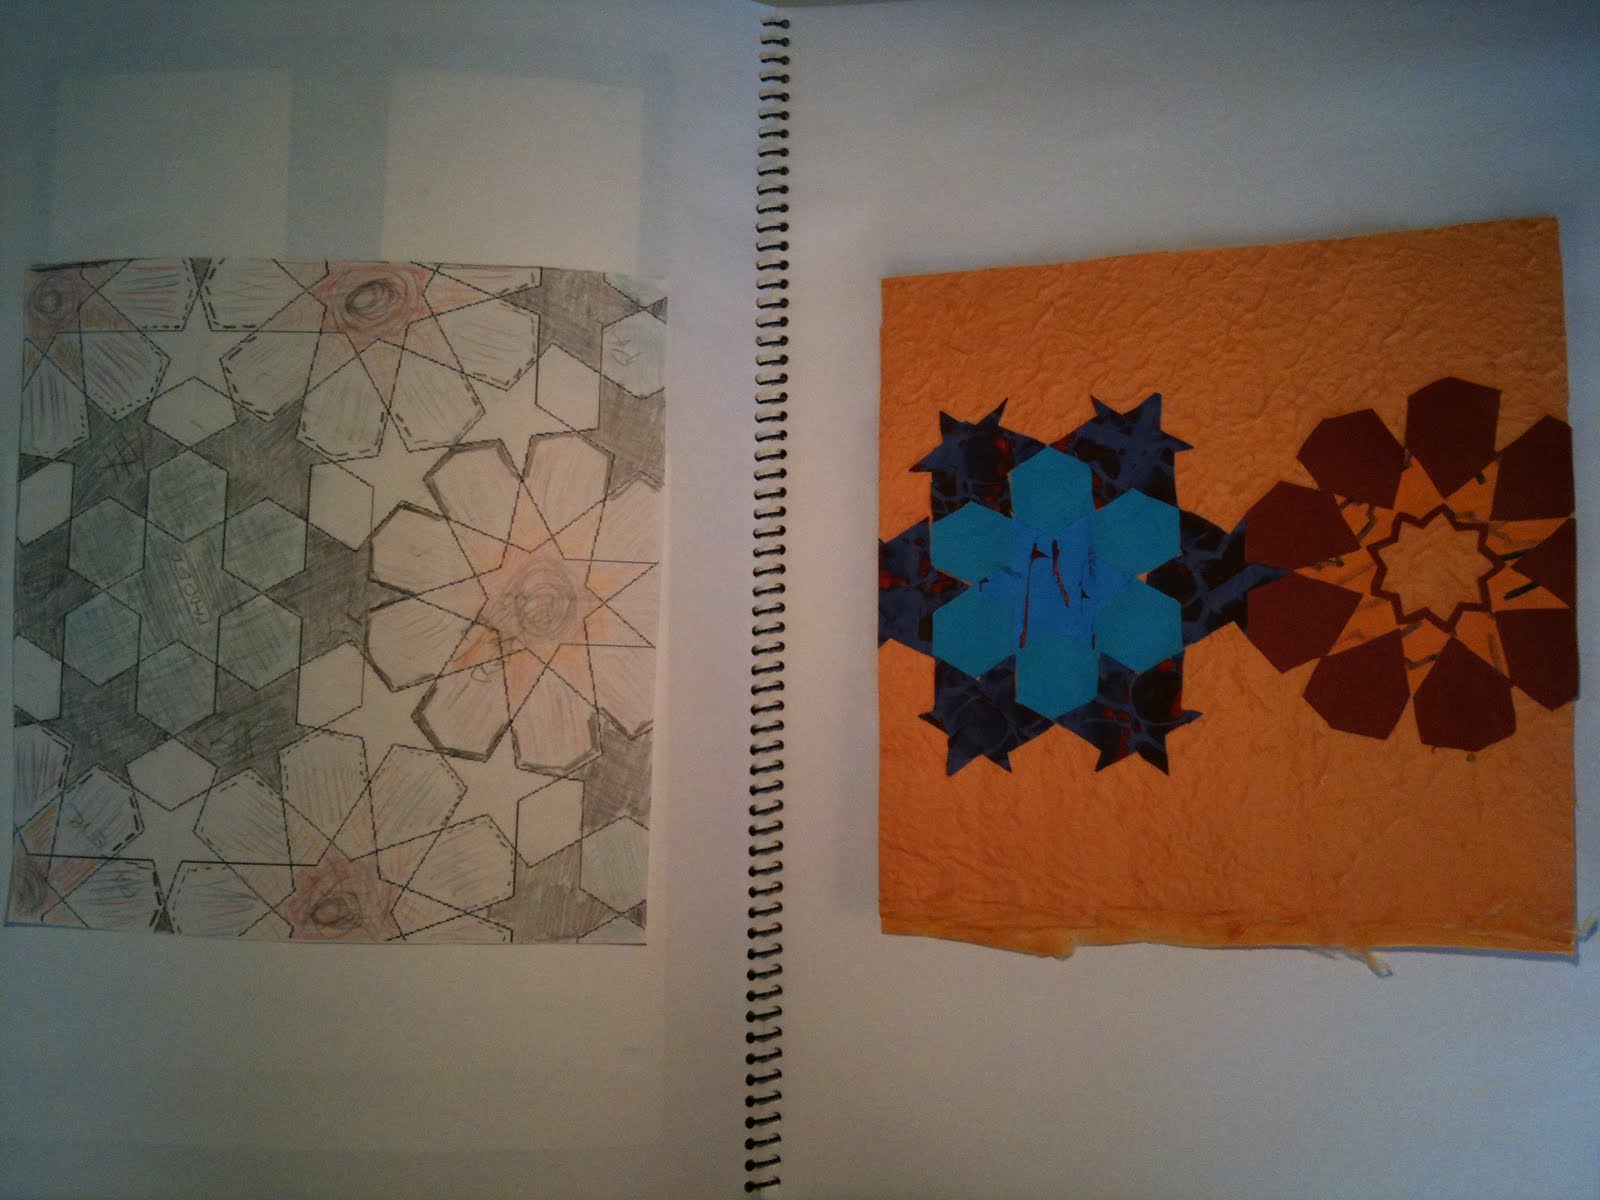
The third sample followed more closely the sample on p. 45 of the course manual. I used a series of 8-pt stars in various stages of disintegration (image 11.12).

11.12 Repeated pattern of 8-pt stars
It was this final paper sample I chose for my Resolved Sample in fabric. The flow goes from the center orange star, right, then down right and clockwise up to the final star at the top right.

11.13 Resolved Sample
I was very disappointed with the results for two main reasons. First, I think I opted for this because it was the easiest to put together. It wasn't thought out well enough in advance. In addition, I had wanted to play with light as an additional element of growth and disintegration. As it is, this piece only shows a moon in on of the star shapes, slashes in one star which are meant to show ripples on the water, and in the dark sky a few stars (and a black hole in the next-to-last star ;-). A stereotypical view. Boring.
I think I'm still stuck in fear of branching out. What if I don't do it the "right" way? (Assuming there is a right answer.) I know I'll get beyond this at some point, but on this final piece, that hesitation kept me from making a decision on the design, starting on it, and seeing it through.
Evaluation:
Overall, I'm rather disappointed with my resolved sample. I think I should have chosen one of the other two designs I made in paper. That said, from this I learned that the more conservative I was (in stars 1 - 5: i.e. center to bottom left), the less interesting the piece was. When I just tried anything, (stars 6-9; i.e. far left to top right), the piece took on more vitality and was more appealing.
I believe it does reflect the theme of "Growth and Disintegration" on a basic level in that the center star is the most solid, structured element, and each successive shape becomes more diffuse. In the final three shapes, the star shape becomes difficult to identify within the materials.
If I were to do this again, I would choose my original design which followed a mosaic structure, clearly-defined shapes running through the center, becoming less so toward the outer edges, combined with light (from behind) getting progressively darker toward the center. I think there would be much more play with light and materials than I produced in this Resolved Sample.
The only direction you can go from the bottom is... up!
Looks like I have a lot of growth ahead of me ;-)
Total hours Chapter 11: 34.5
- * - * - * - * - * - * - * - * -
Chapter 10 - Supplemental
Thank you, Sian, for sending instructions on the plaited insertion stitch. Again (as with the first attempt at doing this), I got the spacing too tight. I understand the technique, now, but have to keep a wider space between the pieces so that the weave shows more space between the threads.


10.7 Supplemental
Plaited insertion stitch
- * - * - * - * - * - * - * - * -
Subscribe to:
Comments (Atom)