18 December 2010

Chapter 3 - Tonal Effects in Machine Stitchery (Part 2)

Machined Stitched Strips

(Puffer Fish)

Working on machine stitched strips. First, I chose the puffer fish with a cable stitch. An exercise in frustration (live and learn ;-). This machine doesn't do curves, so lifting up the foot every other stitch was, well, inconvenient. I liked the way it turned out, although you can't touch it because the stitches will come undone. But it has a neat kind of pattern to it (3.6 [1] below).

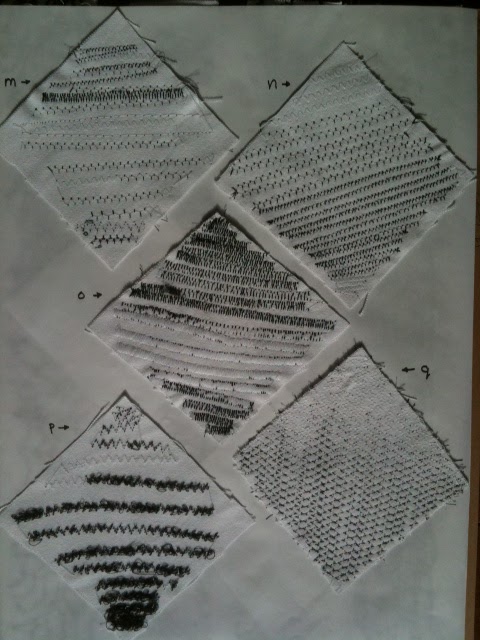
3.6 Four samples of stitched strips

(Eurasian Jay)

Next, I tried the Eurasian Jay with as close to a whip stitch as my machine would go. Varied the top tension button on each row (6-7 for dark, 0-1 for light) to get the varieties of shading. Pleased with the results (but 5 hours for 2 strips?!?!?!) - 3.6 [2] above.

(Sparrow Feathers)

Then worked on Sparrow Feathers. Used the cable stitch for the feathers' central shafts, then turn the strip over and filled in next to each shaft with whip stitches in wide zigzag and then triple stitch zigzag. Interesting effect - 3.6 [3] above.

(Wet Cheetah Fur)

Finally attempted "Wet Cheetah Fur" as the basis for the next strip - 3.6 [4] above. Used a zigzag back and forth to fill in a small patch, leaving the threads on the front hanging. Found that it was best not to have too orderly a pattern - random worked better. Like this effect very much, but again, 5 hours for 2 strips???!

3.7 Machined strips based on animal patterns

Finally, to see what it would look like on a black background, I make three more strips, using white thread, stitching in layers of different directions.

The first strip, 3.7 [1] above uses the spider web as inspiration. In 3.7 [2] above I was using an image of elephant skin as the pattern. 3.7 [3] above is based on the pattern of a giraffe.

(giraffe, elephant, spider web)

OBSERVATIONS on this Chapter....

Although this chapter took many months to complete due to interruptions in "life", I was happy to learn 1) it is possible to manipulate a sewing machine to achieve a variety of effects, 2) on a machine, thread can be used like charcoal - using it in different ways (thicknesses, densities, stitch types) to produce shades, 3) understanding how these different techniques work allows you to interpret textures in a wider variety of ways.

Some of the methods were tedious and time-consuming, yet often yielded the best results, I felt. Also, even a very simple sewing machine can produce quite a variety of effects. I'm sure there are more that I did not even consider.

However, at some point, I would like to learn how to manipulate the length of stitches and to see what effects can be produced with a greater variety of stitch styles.

- * - * - * - * - * - * - * - * -

Total hours Chapter 3: 15


Chapter 3 - Tonal Effects in Machine Stitchery (Part 1)

Hello Blog. Long time no see...

Sometime back in June or July, I started Chapter 3. Frustrated that my machine only has 7 stitch types and no length adjustment to speak of.

Made several samples like the ones in the course guide, and they came out so-so, I guess. See 3.1 below:

a --> medium zigzag
b --> small zigzag
c --> another attempt at medium zigzag
d --> straight stitch in non-parallel rows
e --> straight stitch in parallel rows

3.1 Varieties of stitching and spacing

3.2 below - stitches fanning outward (or inward?):

f --> small zigzag
g --> medium zigzag
h --> hem stitch
i --> short straight stitch
j --> medium zigzag stitched in different directions

3.2 Varieties of stitching and spacing (cont'd)

Then experimented with other things - squares in different intensities or with different spacings. A bit more interesting...

3.3 below:

k --> zigzag stitches (small, narrow at bottom, medium in middle, large toward top)
l --> hem stitch circling in (or out)

3.3 Varieties of stitching and spacing (cont'd)


Finding it a little limiting with my machine and my limited creativity. How is it that some people can see things that could be and turn out the most exquisite pieces with very basic resources? Poetry with ten or fifteen words, etc.

Oh, well. Maybe it can be learned. Forge ahead.

"Whip Stitch" Effect

I found the screw on the bobbin!! Yea! Even though there is no control knob to adjust stitch length on my machine, I was able to change the top tension and achieve some subtle changes - not many, but a few. 

3.4 below:

m --> first try:  a variety of stitches just to see what they looked like.
n --> zigzag stitch: white thread on top, 0 top tension at top of sample, top tension set at 7 for next section to middle. Bottom half small zigzag with top tension set at 7, bottom of sample is small zigzag stitch with top tension set at 0.
o --> medium zigzag stitch, top: top tension set at 2, gradually changing top tension to 9 and then back to 0 toward bottom.
p --> triple zigzag, top tension set at 2, changed to 0, then to 8.
q --> change in stitch direction - triple zigzag stitch, top tension set at 0 for stitching toward top of sample, higher setting for stitches toward middle and bottom of sample.

3.4 Varieties of stitching and spacing

3.5 Whip Stitch and Cable Stitch samples

3.5 r (above) shows an additional sample of whip stitch, fanning outwards, with varying top tensions.

"Cable Stitch" Effect

3.5 s (above) shows a sample using a rather thick black thread in the bobbin, medium zigzag stitch in white thread on top, with straight stitches at top and bottom of sample.

3.5 t (above) shows an additional sample of cable stitch, straight stitch with varying widths between each row.