24 March 2013

Ch 11 Further Designs


Welcome to Chapter 11. Lots of visuals in this blog entry...

Started by photocopying small-print b & w fabric pieces. Used these with earlier printed papers to mix and achieve varying tones. it's hard to judge sometimes which is lighter of darker.

Made blocks, cut, mixed & matched (11.1 ~ 11.6). 


11.1 ~ 11.6 Various printed papers arranged in tonal patterns

In 11.7, I tried to create a dark-light-dark pattern. In 11.8 I tried to vary from dark at the top to light at the bottom.

11.7 & 11.8 Further tonal patterns


In 11.9 ~ 11.12, I made further blocks and then cut diagonally, and then mixed and matched.

11.9 ~ 11. 12 Tonal blocks cut diagonally


I made a mistake with 11.13. I just cut the individual patterned papers in a "stack and whack" fashion, mixed and matched and glued down. I later realized that I could/should have done this with the tonal-gradated blocks. Oh, well.

11.13 Simple "stack and whack" 

11.14 and 11.15 are other designs with photocopied papers of commercial fabrics and stitched/monoprinted fabrics

11.14 

11.15


Then I went back and used the tonal columns to stack and whack again. I was tired of straight lines by the time, so threw in a circle to swap around. I was happy with the result (11.16)! 

11.16 A further variation, using stack and whack method

I needed some further bleached fabric. When I tried is a couple of years ago, the black that I had at the time just didn't seem to work with the bleach. It didn't "take." Since then, I bought some other black fabric, so I used that. Wow! It came out a beautiful copper color! 

I was very careful to take everything outside and work on the deck in the fresh air, using gloves, and keeping our outside cat well out of harm's way.

Using a variety of tools such as a sponge, cardboard, the cap of the bleach bottle, and the ridges in the deck itself (don't worry, there was plastic underneath the fabric), and always keeping in mind the animal patterns I found wa~y back, I created this piece of patterned fabric to work with (11.17):


11.17 Bleached black fabric

Next step, stitching on the bleached fabric (11.18 ~ 11.22). 


11.18 Stitching on bleached fabric

11.19 Details

11.20 Details

11.21 Details

11.22 Details

I then added stitching to some previously dyed fabric (11.23)...

11.23

and some monoprinted fabric (11.24 & 11.25)...


11.24


11.25

while one of the cats, Ten-chan (means "Miss Spot" in Japanese), looked on... (Notice her colors go very well with those of this course ;-)


 11.26 shows the final version of one of the assembled samples:

11.26 Finished sample

in this next sample, 11.27, I tried using the stitched solid white fabric between darker pieces that had been cut and stitched. The seams were sewn wrong sides together.

 11.27 Dark sample with white bars

This next photo is the final stage of another two pieces I'd made but forgot to photograph before cutting up. First I had a medium-to dark square. Then I took a piece from the bleached black fabric in 11.19 above and cut both of them diagonally. Interlacing them, this is the final sample, hanging on our wall (11.28).


11.28

11.29 Sample (11.28 reverse)


11.30 is sample 11.28 hanging next to one of my favorite dyed fabrics from this course.

11.30


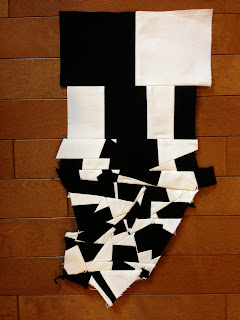
The final (Stage B) sample is a fabric version of "The Challenge" in Chapter 10, but I did not cut diagonally here. I could/should have taken it one step further to cut the bottom piece and continue to cut and stitch which would have given a more complex mixture of tones within that section. Still, looking carefully at the stitching, there are some very interesting patterns in this piece.


- * - * - * - * - * - * - * - * -

Total hours Chapter 11:  16

Safety measures: Care when using bleach, rotary cutter, sewing machine, scissors, iron.... especially around little furry creatures who want your attention!


10 March 2013

Chapter 10: 'Piecing' - A Method of Cutting and Seaming

With one eye on the computer watching the demonstrations around Japan today and two eyes on the sewing machine and three eyes on the rotary cutter (!), I managed to complete Chapter 10:

Chapter 10: 'Piecing' - A Method of Cutting and Seaming

Following the instructions for creating a paper sample of cutting and pasting, the first try didn't come out as I had expected (10.1):


10.1 Sample 1 with "Chu" at the left

So, I tried another (10.2)...


10.2 Sample 2 with "Ten-chan's" feet bottom right

And another (10.3 and 10.4)...


10.3 Sample 3. No cats.

10.4 Sample 3 completed.

Like this one! Let's attempt it in fabric...


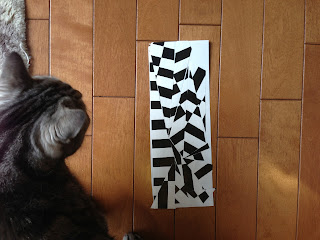
10.5 Steps 1 and 2 (Ten-chan is checking my work)

 10.6 Slicing it up

So far so good.


10.7 Rearranging the pieces


Turned pieces around and sewed together. Added a couple of folded triangles in one seam, added a 5-layer b/w fabric piece in another seam and fringed it. Took me a while to figure out what "press seams sideways" meant. I guessed it meant not iron them flat, so I tried that. They curved a little, and it softens the hard, straight lines throughout, as does the fringe in places.

I realized too late that I should have added even more in the seams, to add other things (I was supposed to have) learned in Chapter 8. It would have made this piece even more interesting.


 10.8.1 finished piece


10.8.2 finished piece


10.8.3 finished piece

Ten-chan appreciated the two "cat's ears" in the foreground above (10.8.3)

___________________________________________________

The Challenge
___________________________________________________

As per the instructions, cut the b/w 90 X 15 cms strips a la Fibonnacci sequence, set aside the smallest section, and started cutting, sewing, repeat....

I started out with some pretty thick fabric, so I wasn't able to get the pieces too small because the machine got stuck. The other "challenge" was, at one point, not being able to iron the seams.

This process was fun, but not really my favorite. I like more organized patterns, so this pushed my boundaries a wee bit ;-)

Timely; thought of Fukushima Daiichi with this piece. Starts out in its nice square package and ends up in a melt-down.


The most important thing I learned in Chapter 10 -- or rather remembered -- was that this course is fun! I learn as much (more?) from things that don't work the way I'd like as when they DO work.

- * - * - * - * - * - * - * - * -

Total hours Chapter 10:  8

Safety measures: Having been away from this course for 2 years, I was aware that I needed to go a little slowly in handling tools such as the rotary cutter and the sewing machine. 

24 February 2013

Hello Blog. Long time no see. Let me catch up a little before starting back with the course.

3.11.11 The quake up north, the tsunami, and the aftermath. It took our breath away. In more ways than one.

It's now almost 2 years since then. It's been a rocky road for me emotionally, even though I wasn't directly involved in the disaster apart from living every day wondering when the next big one will strike, what is in our food, the air, and other little things that people deal with here on a daily basis.

I haven't stayed away from art, though. In fact, that has been one way to go through the "trauma" (nothing at all like what others in Japan experienced so I really need to find another word for it). I have done some sketching and for the past few months have been keeping an art journal, viewing YouTube videos on different processes artists use, various materials that were new to me such as Gesso. That has been interesting and informative. I can see a bit how art journaling can influence textile art.

So, it has taken time to heal, and I'm about ready to pick up from where I left off a year and a half ago, and finish this course. My goal is to start the next course. That means I need to finish this one. My work life has changed somewhat, too. I hope I'll have  at least some Sundays to work on the DS course. 10-15 minutes a day aren't really feasible. I know my limits a little better now. So, barring another disaster, I will walk the path, step by step, toward the Module Two Finish Line.

First step, clear away space, get out the sewing machine, get out the course guide, reread it all the way through, review what I've completed, thread the machine, and begin again.